Julia’s been on tour — last weekend in New Orleans with David to see his family and this week in Tacoma to see mine. We’re all having a ball. Here’s a repost of a Holiday favorite, a traditional Norwegian Christmas cake that I make for family and friends during the Holidays.

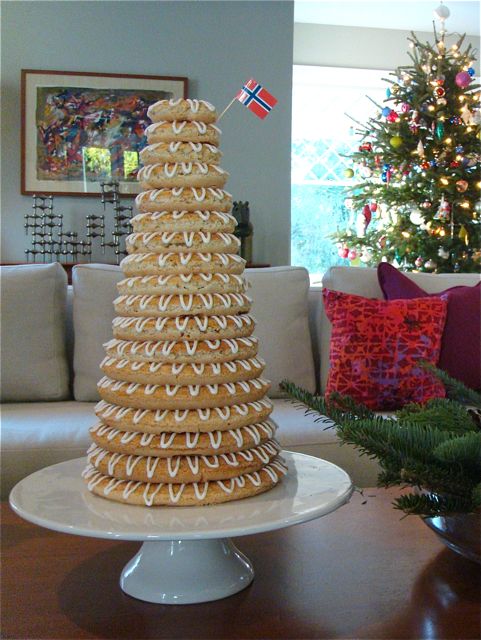
It looks like something the Grinch looted from Whoville, but it’s actually a Norwegian Kransekake (literally “ring cake”), traditionally served at Christmas, New Year’s and on other special occasions. I always bake several around Christmas to give as gifts and to serve to Holiday guests, and they always make a big impression. More a tower of graduated ring-shaped cookies than a cake, it has an almond flavor like an Italian amaretto cookie, but less sweet and with a bit chewier texture. It’s delicious with coffee and makes a showy centerpiece for a spread of Holiday sweets.
You need some specialized equipment to make this cake –most notably the pans that form the rings –and the dough is sticky and stiff, but, once you’re properly equipped and further armed with good directions, this showy cake is much easier to make than you’d imagine, and you can turn one out in about an hour and a half.
Recipe
For the rings:
fine breadcrumbs (for dusting the pans)
18 oz confectioners’ sugar
18 oz almond paste
3 Tablespoons flour
3 large egg whites
For the icing:
3 cups confectioners’ sugar
2 egg whites
2 teaspoons white vinegar or lemon juice.
Equipment: a set of Kransekake pans, available at http://www.ingebritsens.com for $32; pastry bag; pastry tip with approximately 1/2 inch plain opening (as opposed to a star opening), e.g. Ateco #806 tip, available in sets of large piping tips or for $1.89 individually athttp://bakerstools.com.; pastry writing tip, e.g. Ateco #4, available in nearly all cake decorating sets or for $.99 at http://bakerstools.com.; kitchen scale. The pans and the large pastry tip are essential. You can improvise the writing tip by filling a small plastic freezer bag with icing and snipping a very small piece off of one corner.
Instructions:
1. Butter the pans and dust them thoroughly with fine breadcrumbs to prevent sticking; preheat the oven to 300F.

2. Using a kitchen scale, weigh out 18 oz each of almond paste and confectioners’ sugar; place into the bowl of a mixer fitted with the paddle attachment.

3. Add 3 Tablespoons of flour and mix well — the mixture will stay crumbly. (You could also mix this batter by hand.)

4. Add three egg whites and mix until smooth.

5. Fill a large bowl with the hottest tap water you can draw; place the mixing bowl in the hot water and stir frequently until the batter is lukewarm and has a satiny texture. (This should take about 5-8 minutes.)


6. Dust a clean work surface with about 1/4 cup of confectioners’ sugar and turn the batter onto the prepared surface. Let it rest for at least 10 minutes.

7. Knead for about two minutes. This will feel like a sticky mess, and you may worry that you’ve somehow failed to work the batter (now almost a dough) to the right consistency. Don’t worry. It’s supposed to be a sticky mess at this point. Also, the recipe provides ample batter for the cake, so don’t fret over salvaging every bit that will stubbornly cling to your hands (and everything else it touches).
8. Scrape the batter into a pastry bag fitted with your large tip and pipe into the concentric grooves of the prepared pans. Try not to overlap the ends of your batter rings.

9. Bake for 20 minutes until light golden brown. Take care removing the pans from the oven — when hot, the cake is very fragile. I use a large metal spatula to keep my mitted thumbs out of the cake. A small pizza peel would also work.

10. While they’re still hot, separate the rings by gently running the point of a small knife between them. Don’t remove the rings from the pans until they’re completely cooled. Once out of the pans, several of the rings will probably still be somewhat stuck together, so use your knife again to gently separate them. If a ring breaks, don’t worry — you can easily piece it back together when you assemble the cake.

11. Make the icing by combining all the ingredients and stirring until well blended. Scrape the icing into a pastry bag fitted with a writing tip.
12. Arrange the cake rings to the side in order of size and then assemble the cake, piping a zigzag pattern over each ring before adding the next.

If you have a broken ring or two (which is not uncommon), put the pieces in place, pipe the icing over them and continue.


Rotate the plate as you build to keep your tower from leaning.

The finished cake will keep uncovered for at least a week. Don’t refrigerate it or seal it in an air-tight container (the cake will get soggy). If the cake becomes dry and brittle, put a slice of moist bread in the cavity, and this will soften it up. The traditional way to eat Kransekake is to break off rings from the bottom up, preserving the cake’s shape so it can be served on several occasions.

![]()

